How to Version Control Your SQL
A self-starter's guide to getting started with git
Why version control your SQL? Because …
My interest in version control started when my team was assigned a big conversion project. We changed hundreds of SQL queries from one SQL dialect to another.
In theory, I knew that version control could:
Help us compare queries to find differences
Compare a previous version to a new version of a query
Allow me to undo a change made to my code that didn’t have the intended effect
Allow our team to collaborate when someone needed help with a query
But in practice, I had no idea how all of it would work.
Learning git is hard. Even understanding what git is can be hard if you’ve never used version control before.
There are lots of resources out there for understanding git, all of which make way more sense when you already understand git. I think the best way to learn is by doing, but that’s not helpful when it’s so hard to learn how to start.
This tutorial attempts to show you how git works without explaining all its mysteries up front. I’ll show you how to get set up to version control SQL using GitHub and DBeaver.
Minimum Viable Git Concepts
You may have a directory on your computer with a bunch of files that looks like this:
SuperImportantQuery.sql
SuperImportantQuery-Weekly.sql
SuperImportantQuery-April-Wk1.sql
SuperImportantQuery-April-New.sql
SuperImportantQuery-April-WK3.sql
SIQ2.sql
SIQ3.sql
Version control is an alternative to saving multiple copies of a file to keep change history.
With version control, the list above might look like this:
SuperImportantQuery.sql
SuperImportantQuery-Weekly.sql
With version control, you’d still have all the history the multiple copies provide (or more) without saving all the copies! It’s magical! ✨
Version control tracks changes to code files, like a SQL query. Git is a type of distributed version control. A set of changes is registered with version control software when you commit them. Commits are accompanied by messages explaining the reasons for the change.
Git tracks changes between committed versions at a line by line level. You can compare any version to the previous or current iterations. Since git saves the differences between versions it can use them to reconstruct any prior version of a query that you have committed. You can reset your working space to a previous version of a query if you decide you need to undo a change you’ve made.
Commit messages accompany every commit and provide the reasoning for the change. Commit messages, if written well, explain why a certain change was made. You don’t need to explain what changed, because git will keep track of that for you.
Multiple people can collaborate by pushing their changes, in the form of commits, to a repository. Repositories are where git stores your code and your changes. Git is distributed, which means that each contributor has a full copy of the repository and there is an additional copy on the git origin or remote.
This tutorial will demonstrate all of these minimum viable git concepts.
Overview
We’ll get DBeaver set up to communicate with a repository on GitHub, which we’ll create. In that repository, we’ll create a query using the DBeaver sample database and commit the original plus two changes.
At the end, I’ll get you set up to solve the SQL murder mystery with version controlled SQL so you can practice.
Step 1: Install DBeaver
Skip this step if you’ve already got it. I use the free DBeaver community edition. Allow DBeaver to install the free sample database - we’ll use it later on.
This step gets us a SQL query tool and a database to work with.
Step 2: Install the Git Extension within DBeaver
From DBeaver, go to Help -> Install New Software
From the Work With Dropdown choose : https://dbeaver.io/update/git/latest/
Check the box for DBeaver Git Support and finish the install by following the prompts.
(If you 🖤 dark mode, you can install the Darkest Dark theme from the same menu. My DBeaver is dark in the gifs and screenshots below)
This step gets DBeaver set up to interact with git repositories.
Step 3: Create an Empty Repo on GitHub
A repository (repo) is a folder with a collection of files synced to a remote (origin). Changes to files on the repo are tracked when you commit them. I called mine git_in_DBeaver.
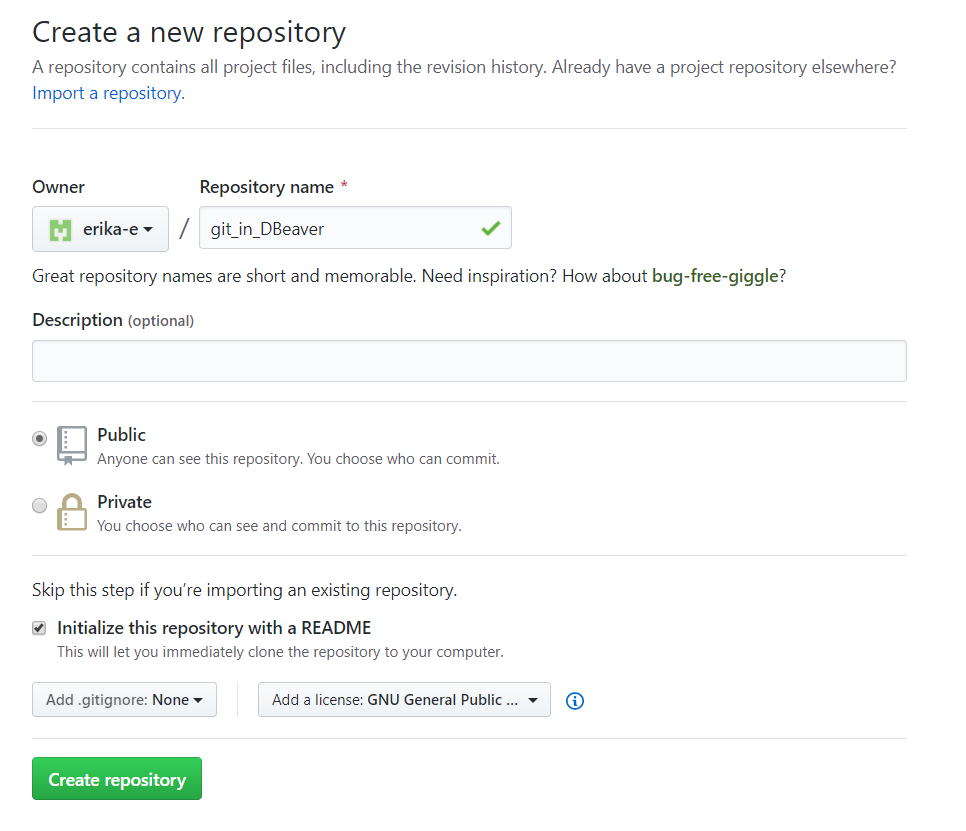
In this step, we’re setting up a remote repository. We’'ll use the git extension we just installed to communicate with it. No command line required. 🥳
Step 4: Create a Project From Your Repo in DBeaver
Now we’re going to tell DBeaver how to find our repo.
DBeaver has a default file structure for each project that it uses to organize connections, scripts, and other artifacts. Setting up your project from DBeaver using the empty repo you just created ensures it can put all its files where it wants them.
First, I’ll need my repo’s URL from git. Copy the address given when you click on the clone or download button.

Follow the steps in the quick gif below to add your repo as a DBeaver project. Keep the default settings. If you have your repo URI copied to the clipboard, it will auto populate.
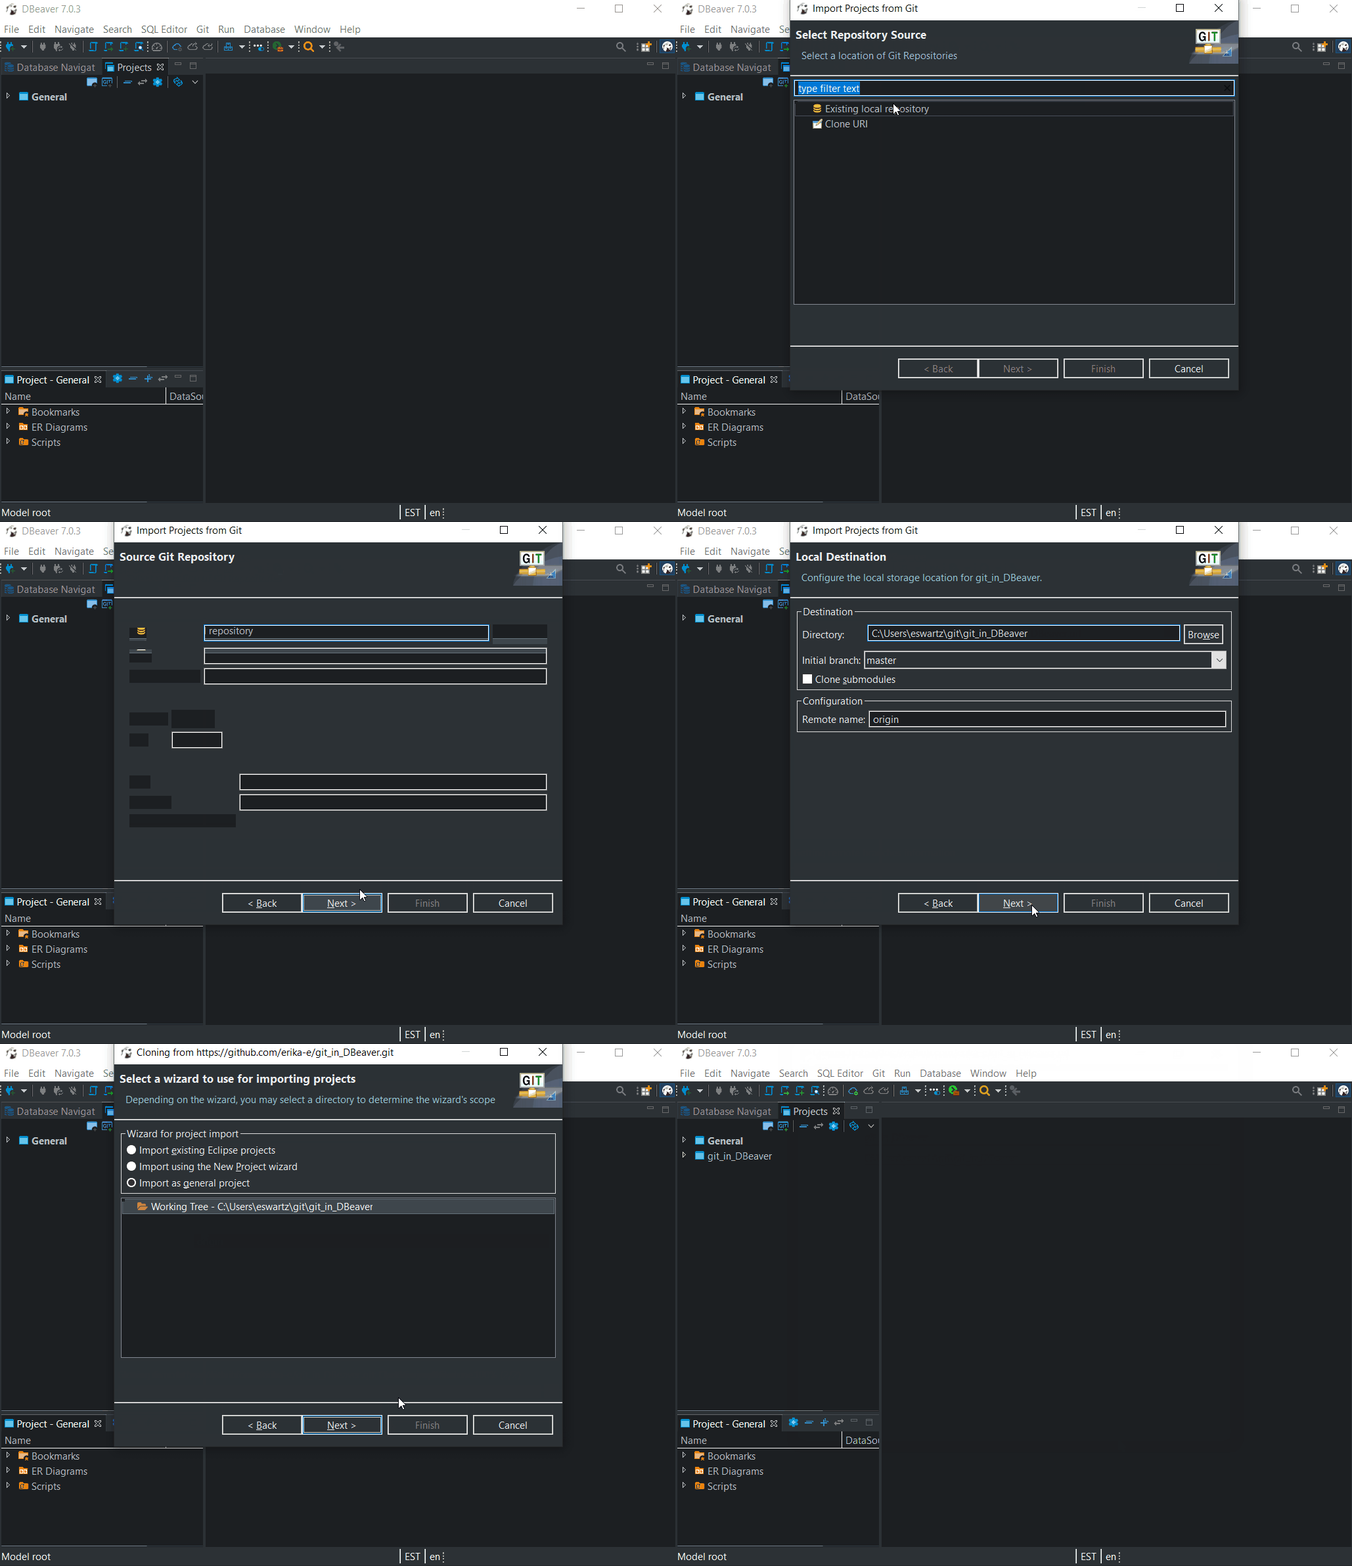
Now that we’ve completed this step, a DBeaver project with the same name as the repository it is synchronized with will appear in the projects pane.
Step 5: Open Git Staging
This pane of the DBeaver workspace will let us see the state of our files, write commit messages, and push changes to our remote repo. It doesn’t open automatically, so you need to go through the steps below to show it.
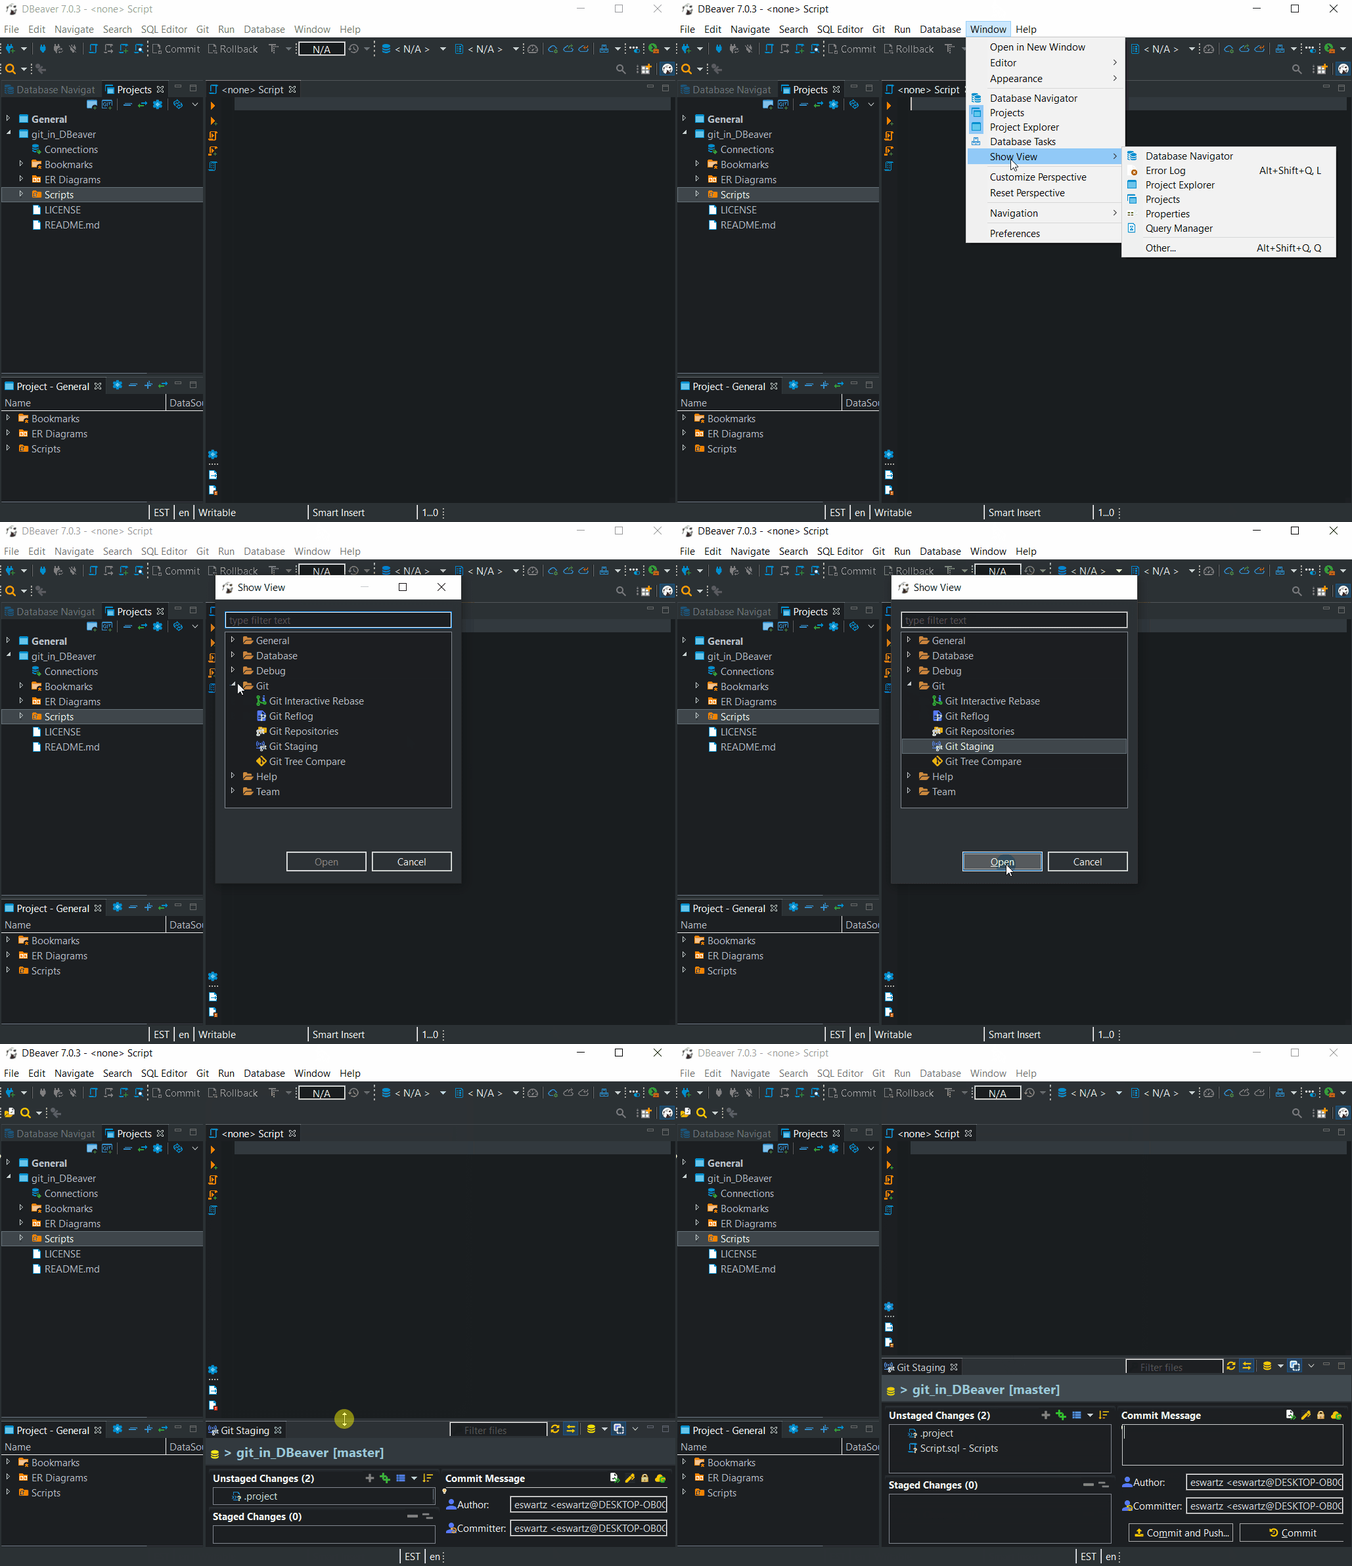
Everything up to this point has been setup - getting ready to write and version control SQL. Now we’re going to switch gears and …
Step 6: Finally Write Some SQL
For this part of the tutorial, you can follow along with your own repo, or read along. First, I’m going to copy my sample database connection from my general project to the new one I’ve created.
At the fictional company Sample Tunes Inc, you’re an analyst. Your boss asks you to figure out what the company’s sales are by genre. To do this, we’ll use the sample database in DBeaver, which has tables called InvoiceLine, Track, and Genre.
First up, let’s write some SQL to find sales dollars for each invoice line using the sample database.
SELECT
Quantity*UnitPrice AS SalesDollars
,TrackId
FROM InvoiceLine
GROUP BY InvoiceId
I’ve created this file in my DBeaver project, saved it, and named it SalesbyGenre.
Step 7: Simple Git Workflow
We’ll follow this simple git workflow as we make changes to our SalesbyGenre.sql query.
Let’s take a look at the workflow and where we are:
Make changes to your query file ✅
Save changes ✅
Stage the changes 📍 - we are here
Write a descriptive commit message
Commit and push the changes
At this point, we have saved changes that we haven’t committed.
In DBeaver, we’ll see these changes in the staging window, under unstaged changes. Git is telling us that we have changes to our files it doesn’t know about.
Stage Changes
If you look at my staging window, you’ll see my script, but you also see an unrecognized file .project. This is a DBeaver file we’d rather not version control, so I’ll ignore it for now, and stage my changes. Staging tells git which files you’d like to include in your commit.
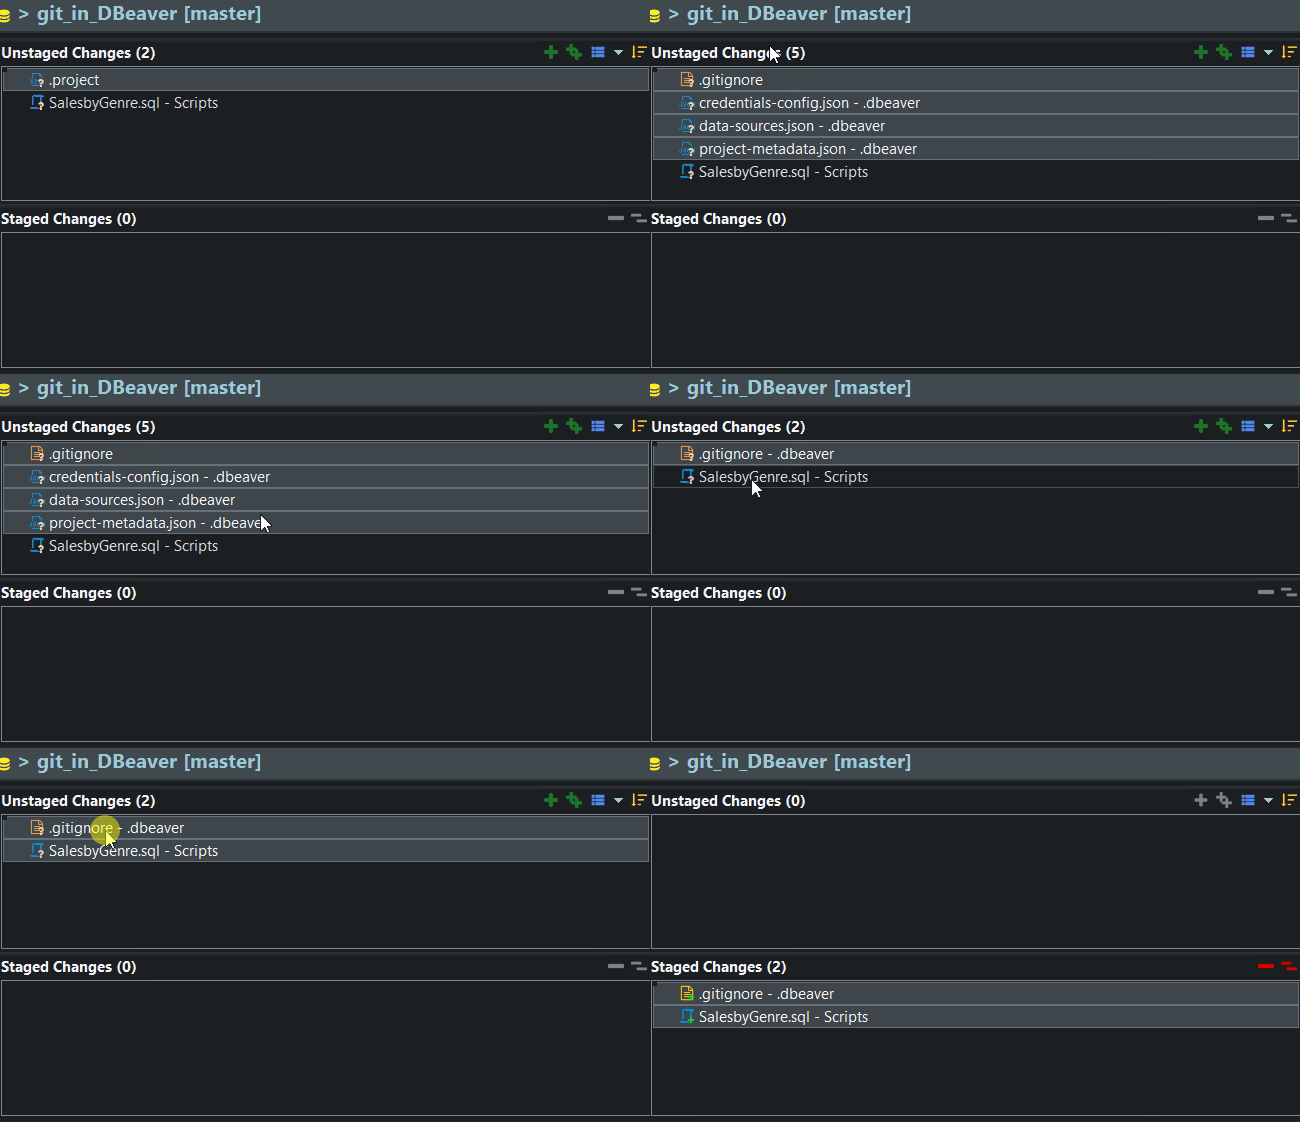
Write a Commit Message, Commit & Push
The first commit will add my query to the repository - the message I write to accompany it will have a subject and a body.
The subject completes the sentence “If applied, this commit will… add script for sales by genre.” When you pull changes someone else has made to a remote repo, these subject lines describe the changes which will be applied to your local copies of the file(s). More on guidelines for the format of commit messages here.
Typically the reason for the change is explained in the body of the message, which is separated from the subject by a blank line.

To push to GitHub, I’ve used the following format in the DBeaver author and committer fields.
erika-e <erika.swartz@gmail.com>When I pushed, DBeaver prompted me for my GitHub username and password. The first commit message and the changes will now appear in my repository on GitHub.
I’ll note here that you don’t have to push every commit. Git workflows are out of scope for this tutorial.
Let’s go back to our simple workflow and see where we are:
Make changes to your query file ✅
Save changes ✅
Stage the changes ✅
Write a descriptive commit message ✅
Commit and push the changes ✅
For each change we make, we’ll iterate through that same workflow.
What’s in a Commit
Here’s an animation of the second commit I made on my query, adding joins to the query. This shows how to use the staging window to write a commit message.

Let’s take a closer look at that second commit, with this screenshot from GitHub. Here we’re going to take a look at some of the ✨magical✨ features of git.
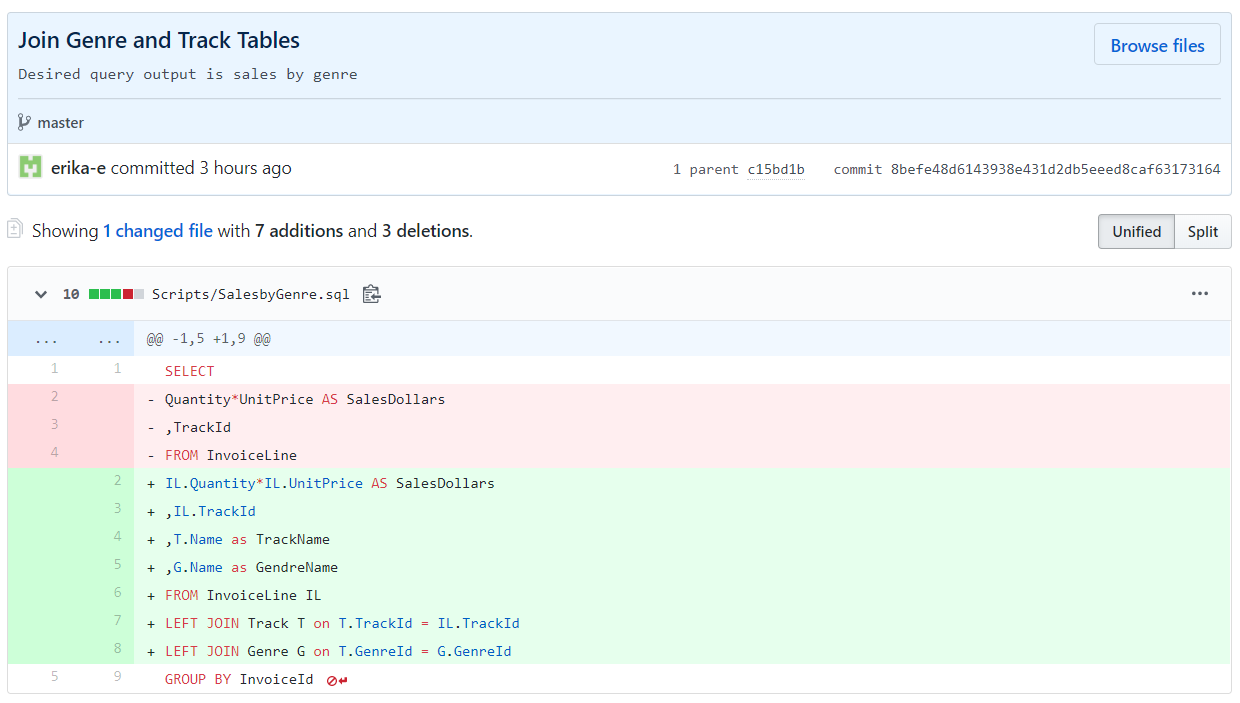
Git provides a summary of the commit : 1 changed file with 7 additions and 3 deletions. The diff view highlights these changes in green and red, for the additions and deletions, respectively.
Here’s where git gets powerful. I never have to write a message or a comment documenting what has changed, because git tracks that for me. I can easily see with diffs what is changing from version to version of the file — I never have to save a copy. Commit messages don’t (and shouldn’t) document what changes, so you can focus on the why behind the change.
Commit messages can be an important form of code documentation. In this case, the body of my messages is only moderately helpful. It doesn’t tell you why I’ve joined Genre and Track, only that the desired output is sales by genre.
A more helpful message could have said “InvoiceLine has TrackId in each invoice line record, joining Track to join a GenreId and Genre to join genre names.”
Wrapping Up
You can see the final version of my query on GitHub here, or below.
SELECT
G.Name AS Genre
,SUM(IL.Quantity*IL.UnitPrice) AS SalesDollars
FROM InvoiceLine IL
LEFT JOIN Track T on T.TrackId = IL.TrackId
LEFT JOIN Genre G on T.GenreId = G.GenreId
GROUP BY G.Name
ORDER BY SUM(IL.Quantity*IL.UnitPrice) DESC
As I built my query up, I committed my changes. The history view in DBeaver (or on GitHub) shows me the three versions of my script. Each shows an Id for the commit and the first line of my commit message.

Each change I made I pushed, or sent to the origin, which is the copy of my repository on GitHub. All of the changes were made on the master branch.
As you deepen your understanding of git, you’ll learn more advanced concepts that are beyond the scope of this tutorial. Concepts like git workflows for collaborating, branches for new features, rebasing, and managing merge conflicts make git a powerful and efficient code management tool.
Try it Yourself - Solve the SQL Murder Mystery
The SQL murder mystery is a great SQL learning exercise created by the Knight Lab. In it, you’ll use SQL queries on a set of databases to find out whodunnit.
To get started solving, find the repository on GitHub here.
Fork a copy on over to your own GitHub account by clicking fork in the upper right of the GitHub page. You can retrace steps 4 and 5 from above to create a project in DBeaver linked to your forked copy of the repository.
You’ll need to create a new connection in your project to the database file. Choose SQLite and the sql-murder-mystery.db file. I haven’t had good luck versioning DBeaver connection files, so I always add them to gitignore. I added the .db file to my ignore for this project also.
If you want to see a worked example of git + SQL together, you can find my solution to the SQL murder mystery here. It is in the Scripts/Solutions folder.
Warning : it contains spoilers in the commit messages. Sorry about that.
Stuck? Have Questions?
Use the comments below or find me on twitter.


Is there a way to apply DDL changes directly at the DB object level? The idea here is to force developers to go through a unified process whereby they have to check out an object on Git first (lets say a table from a database under the "Connections" object), if they want to apply changes at the DB level. Based on my current understanding, it looks like you have to maintain a separate set of folders to maintain the DDL scripts just like the "Scripts" folder, in order to track DDL changes to the DB.